
If your pour over coffee has started tasting a little flat, bitter, or just not as clean as it used to, your gear could be part of the problem. Coffee oils, residue, and mineral buildup can build up faster than most people realize, and even great beans will struggle to shine if your setup is not clean.
The good news is that learning how to clean a pour over coffee maker does not have to be complicated. A simple routine can help you keep your dripper, server, kettle, and filters in better shape so every cup tastes fresher and more balanced.
In this guide, you’ll learn how to clean your pour over coffee maker properly, how often to do it, and which parts of your setup need the most attention.
Quick Answer: How To Clean A Pour Over Coffee Maker
To clean a pour over coffee maker, rinse your dripper and server after every brew, wash them regularly with warm water and mild soap, and deep clean them when coffee oils or residue start to build up. If you use a kettle for pour over coffee, descale it as needed to prevent mineral deposits from affecting flavor.
Why You Should Clean A Pour Over Coffee Maker Regularly
It is easy to think your pour over setup stays clean because the brewing process looks simple. After all, you are mostly using hot water, paper filters, and fresh coffee grounds. But over time, coffee oils, fine particles, and mineral deposits can collect on your gear and quietly change the taste of your coffee.
That buildup can dull the bright, clean flavor pour over coffee is known for. Instead of tasting crisp and balanced, your coffee may start to seem muddy, sour, bitter, or just a little “off” in a way that is hard to explain.
Regular cleaning helps protect the flavor in your cup. It also helps your gear last longer, especially if you are using a glass carafe, metal kettle, reusable filter, or ceramic dripper. A clean setup gives you a better chance of tasting what your beans are actually supposed to taste like.
How Often To Clean A Pour Over Coffee Maker
The best cleaning routine is the one you can actually keep up with. You do not need an overly complicated system, but you do want to stay ahead of residue and buildup before they start affecting flavor.
Here is a simple way to think about it:
After Every Brew
Rinse your dripper, carafe, and any reusable tools with warm water right after brewing. Throw away used paper filters immediately, and do not let wet grounds sit in the brewer longer than necessary.
Every Few Days To Weekly
Wash your brewer and server with warm water and mild dish soap. If you use a reusable metal filter, give it extra attention so trapped oils do not build up in the mesh.
Monthly Or As Needed
Deep clean your pour over setup if you notice visible residue, dull-looking glass, off smells, or coffee that tastes less fresh than usual. If you use a gooseneck kettle, this is also a good time to check for mineral buildup and descale it if needed.
If you have hard water, you may need to deep clean and descale more often. If you brew pour over coffee every day, staying consistent with quick rinsing and regular washing will make the deeper clean much easier.
How To Clean A Pour Over Coffee Maker Step By Step
Cleaning your pour over coffee maker does not need to take long. A few simple steps can help remove coffee residue, prevent stale flavors, and keep your brewing routine feeling easy.
1. Rinse Everything Right After Brewing
As soon as you are done brewing, discard the used filter and grounds, then rinse the dripper and server with warm water. This helps stop coffee oils from drying onto the surface and becoming harder to remove later.
2. Wash With Warm Water And Mild Soap
Use a soft sponge or cloth with warm water and a small amount of mild dish soap to clean the dripper, carafe, and any reusable accessories. Focus on spots where coffee tends to collect, especially around the base, spout, or inside the server.
3. Pay Attention To Reusable Filters
If you use a metal or cloth filter, make sure you clean it thoroughly. Reusable filters can trap oils and fine particles more easily than paper filters, and that buildup can quickly affect flavor. Rinse well and let it dry fully before using it again.
4. Deep Clean When You Notice Buildup
If your gear looks cloudy, smells stale, or feels like it has a film on it, it is time for a deeper clean. This is especially important for glass servers and frequently used drippers, where residue can build up gradually without being obvious at first.
5. Let Everything Dry Fully
Before putting your gear away, make sure it is completely dry. Storing damp equipment can lead to lingering odors and makes it harder to keep everything feeling fresh between brews.
What Happens When Your Pour Over Gear Gets Dirty
Dirty pour over gear does not always look dramatic. Sometimes the biggest clue is simply that your coffee stops tasting as good as it used to.
You might notice:
- a more bitter or stale taste
- muted flavor notes
- a muddy or less clean finish
- off smells in your dripper or server
- visible residue or cloudy glass
When that happens, it is easy to blame the beans, the grind size, or your technique. Sometimes the real issue is much simpler: your setup needs a proper clean.
If you are trying to dial in better flavor, clean gear is one of the easiest wins. And once your setup is clean, it becomes much easier to notice what is changing in the cup. The free Pulse Pour tasting journal and flavor wheel can help you track those changes so you can brew with more confidence.
How To Deep Clean A Pour Over Coffee Maker
Even if you rinse your gear after every brew, coffee oils and fine residue can still build up over time. That is where a deeper clean comes in. This step helps remove the film, stale smells, and hidden buildup that regular rinsing can miss.
A deep clean does not need to be something you do constantly, but it is worth doing when:
- your glass server starts to look cloudy
- your dripper has a dull or oily feel
- your reusable filter seems harder to rinse clean
- your coffee tastes a little off even when your beans and brew method have not changed
Start by washing your dripper, server, and any reusable tools with warm water and mild dish soap. Use a soft sponge or brush so you do not scratch glass, ceramic, or delicate finishes. Pay extra attention to corners, spouts, grooves, and anywhere coffee tends to collect unnoticed.
If you are cleaning a reusable metal filter, be especially thorough. Oils and fines can get trapped in the mesh and slowly affect the taste of future brews. Rinse it well, wash it gently, and make sure it is fully dry before storing it.
For stubborn residue, let the item soak in warm, soapy water for a short time before cleaning again. In many cases, that is enough to loosen buildup without needing anything harsh.
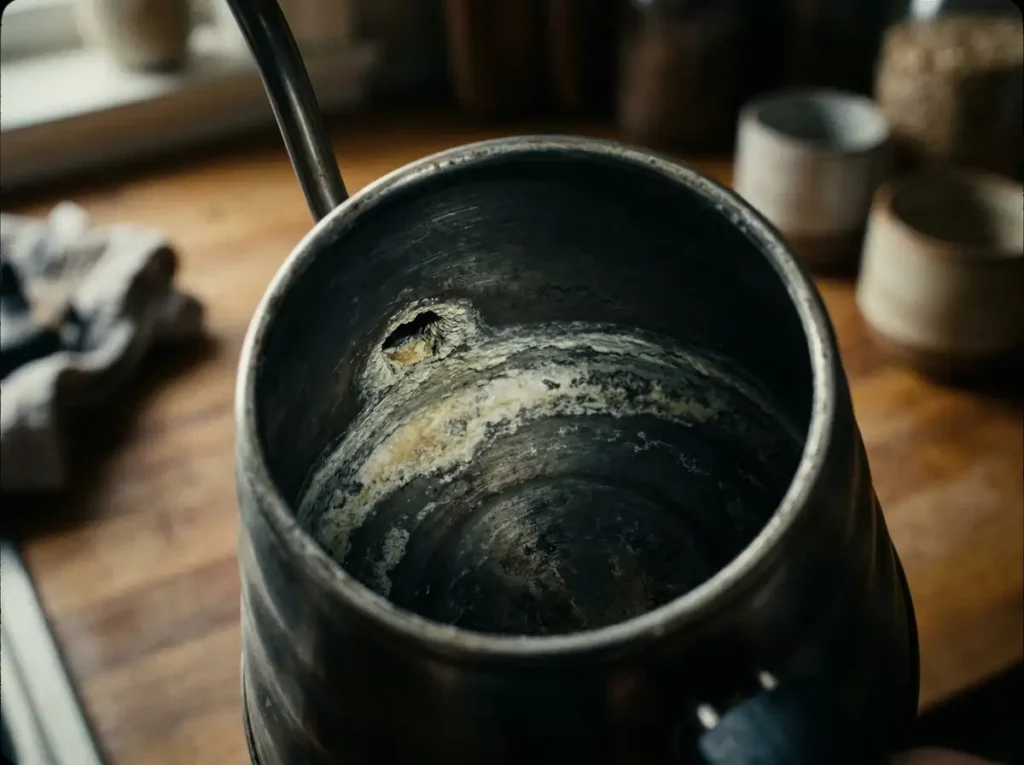
How To Descale Your Pour Over Kettle And Gear
If you use hard water, mineral buildup can become part of the problem too. Unlike coffee oils, mineral deposits tend to collect from the water itself, especially in kettles and on surfaces that are heated often.
You may need to descale your kettle or other gear if you notice:
- white or chalky spots
- cloudy buildup that does not wash away easily
- slower kettle performance
- water that no longer looks clean when heated
- flavor that seems dull even when your coffee routine has not changed
Descaling helps remove those mineral deposits so they do not interfere with your water or leave behind residue in your brewing setup.
How To Descale A Gooseneck Kettle
Fill the kettle with a descaling solution or a gentle vinegar-and-water mixture, depending on what the manufacturer recommends. Let it sit long enough to loosen mineral buildup, then rinse thoroughly several times so no cleaning taste is left behind.
If your kettle has heavy buildup, you may need to repeat the process. Just make sure you always follow the care guidance for your specific kettle, especially if it has special coatings or electric components.
How Often Should You Descale?
That depends mostly on your water. If you use hard water and brew every day, you may need to descale more often. If you use filtered water and your kettle stays clean, you can usually go longer between cleanings.
A good rule of thumb is to check your kettle regularly instead of waiting until buildup becomes obvious. Small maintenance steps are much easier than dealing with heavy scale later.
Common Cleaning Mistakes To Avoid
Cleaning your pour over coffee maker is simple, but there are a few mistakes that can make things less effective.
Letting Coffee Residue Sit Too Long
The longer coffee oils and grounds sit on your gear, the harder they are to remove. A quick rinse right after brewing goes a long way.
Forgetting About Reusable Filters
Reusable filters need extra attention because they hold onto oils and fine particles more easily than paper filters. If they are not cleaned well, they can affect flavor fast.
Storing Gear Before It Is Fully Dry
Putting damp gear away can lead to stale smells and make your setup feel less fresh the next time you brew.
Only Cleaning When Something Looks Dirty
Some buildup is easy to miss, especially if it develops gradually. If your coffee starts tasting dull or muddled, your gear may need a deeper clean even if it does not look especially dirty.
Frequently Asked Questions & Troubleshooting
What if my brewer still smells stale after cleaning?
Try soaking everything in a mixture of vinegar and water for fifteen minutes, then rinse a few times under hot water. Sometimes old odors hide in corners. Avoid leaving it closed up between uses, as air flow helps.
Can I put all pour over coffee makers in the dishwasher?
Always check your specific model. Most glass and stainless brewers handle the top rack, but many wood, cork, or leather accents can crack or warp. If you’re not sure, stick to handwashing.
How do I get rid of stubborn brown stains on glass?
- Make a baking soda paste and let it sit on stains for five minutes, then scrub gently.
- If stains persist, fill your brewer with hot water and a tablespoon of vinegar and soak overnight.
Should I replace my mesh filter or cloth filter?
Metal filters last years if cleaned properly. If holes are clogged that won’t clear with soaking and scrubbing, or if you notice any weird flavors, it’s time to replace. Cloth filters should be boiled, stored dry, and replaced every few months. Signs like persistent bad smells or stiffness mean it’s time for a fresh one.
Final Thoughts & Handy Reminders
Pour over cleaning is really about making sure every cup tastes as good as your first. Quick rinses, gentle washing, and a bit of attention to details keep your coffee sweet and your brewer in top shape. Even a few moments of daily care make a big difference in the freshness of your coffee and the life of your equipment. Coffee deserves a clean stage to really shine!
How to Clean Pour Over Coffee Makers – Quick Checklist:
- Rinse and wipe down your coffee gear every day.
- Do a deep clean with vinegar or baking soda each week.
- Let everything dry completely before putting it away.
- Use good water for brewing and cleaning.
- Keep an eye on filters and replace them if needed for best taste.
If you want to make sure your brewing process is dialed in from start to finish, check out my full step-by-step guide on perfecting pour over coffee.
Keeping up with clean pour over gear means great-tasting coffee and fewer future headaches from stains or smells. Enjoy your next pour over, and if you have any cleaning tricks or questions, drop them below. With these steps, you’ll always have coffee gear that’s ready to help you make an eye-catching, delicious cup at home.
Continue Learning
Best Pour Over Methods

The best pour over coffee methods don’t require expensive gear or fancy equipment. You can get by with just the essentials and make extraordinary cups of coffee
Perfecting Pour Over
Want to perfect your pour over coffee? It may seem simple, but there’s a lot that can go wrong on your path to perfection. Try this instead.